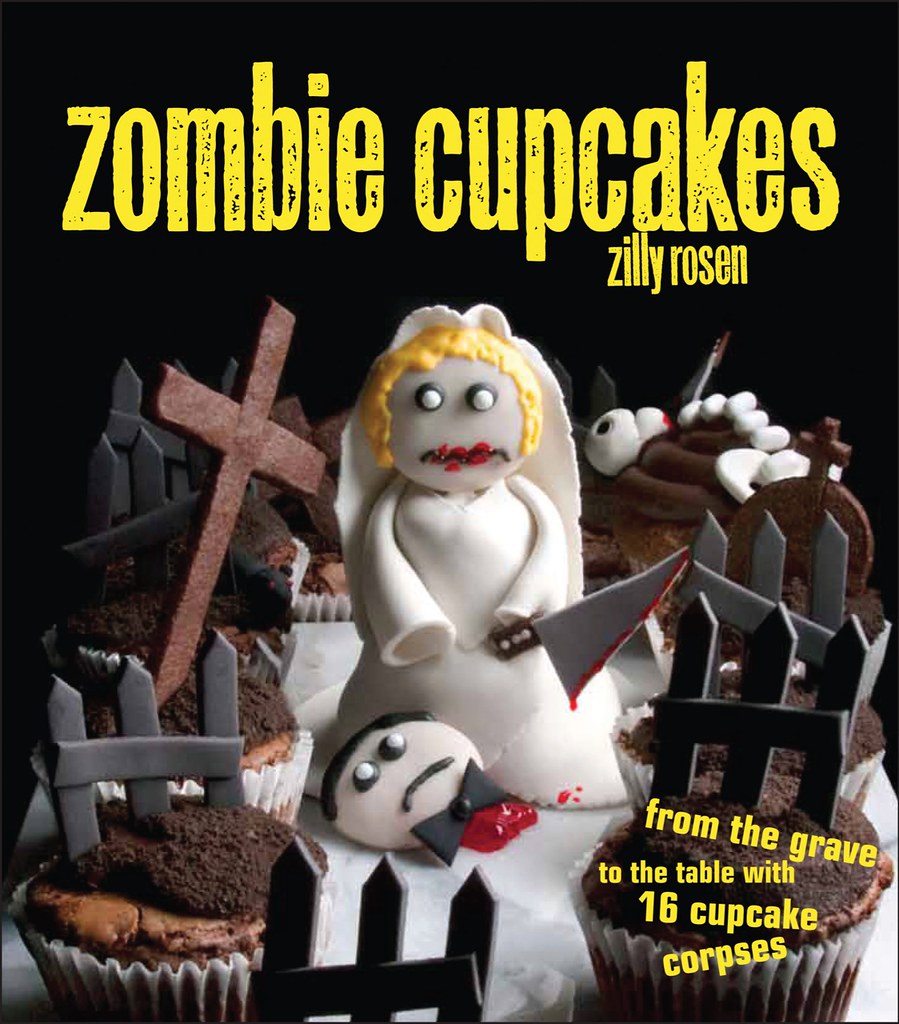
I'm excited to share this recipe and photos with you from the cookbook Zombie Cupcakes: From the Grave to the Table with 16 Cupcake Corpses by Zilly Rosen, who you may remember from her art exhibit featuring Obama and Lincoln cupcakes at the Smithsonian American Art Museum over President's Day 2009. Stay tuned for a giveaway of the book next week!
Zilly also runs Buffalo, New York bakery Zillycakes.
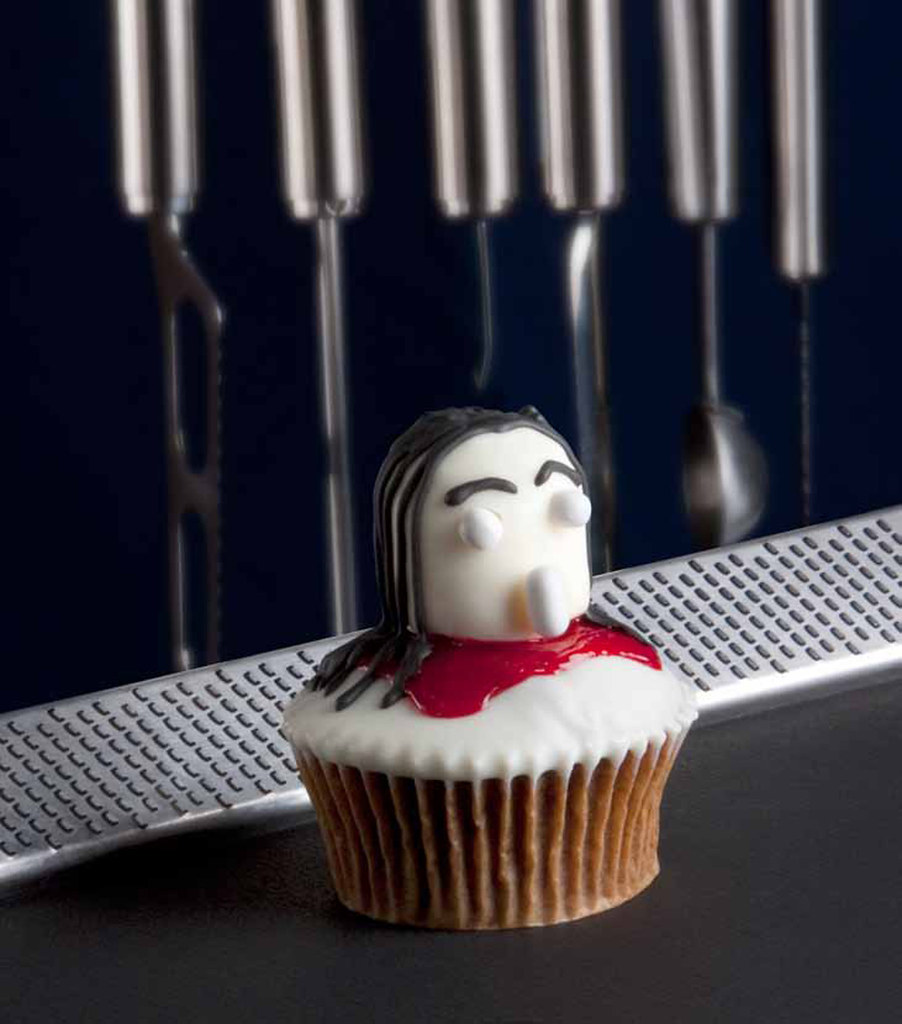
Decapitated zombie gingerbread cupcakes
• 6 tbsp milk
• _ tsp baking soda
• _ cup plus 1 tbsp (4_ oz) unsalted butter, softened
• _ cup firmly packed dark brown sugar
• _ cup blackstrap molasses
• 3 large eggs, beaten
• 1 cup plus 3 tbsp white all-purpose, cake, or pastry flour
• 3 tsp ground ginger
• _ tsp ground cinnamon
Decorations
• 12 marshmallows
• 8 oz white couverture or cooking chocolate
• 36 white hard mint candies
• 6 oz Piping gel “Blood” (see page 10)
• 8 oz Royal icing, colored black with 18 drops black paste food coloring; or brown with 36 drops brown paste coloring; or yellow with
4 drops yellow paste food coloring (see page 10)
• 12 knives (see page 15; optional)
Imagine you are cornered by a zombie in your kitchen. If you have any hopes of surviving, your best bet is to grab the nearest butcher’s knife and take a good swing. This heavenly gingerbread cupcake illustrates what a proud survivor might do after they’ve fought off the zombie’s attack: display the severed head and brag. The head is made from a marshmallow dipped in melted white couverture—good quality coating chocolate with a high percentage of cocoa butter.
1 Preheat the oven to 325°F. line a 12-hole muffin pan with 12 large paper baking cases. Put the milk in a bowl and stir in the baking soda until dissolved.
2 Put the butter and sugar in a large bowl and, using an electric whisk, beat together until pale and fluffy. Beat in the molasses and then gradually beat in the eggs. Sift the flour and spices into the mixture and beat together, then gradually beat in the milk mixture. Spoon the batter into the paper cases. Bake for about 25 minutes, turning once halfway through baking, until firm to the touch. Transfer to a wire rack and let cool.
3 For the heads, snip the corners off the top edge of each marshmallow using scissors and then cut into a domed shape. Insert a toothpick into the bottom of each marshmallow.
4 Melt the chocolate, stirring every 15 seconds, in a microwave oven on low or in a heatproof bowl set over a saucepan of gently simmering water. Dip the marshmallows into the melted chocolate up to the flat edge, allowing any extra chocolate to drip back into the bowl.
5 stick a head-topped toothpick into each cooled cupcake so that it stands upright and let set. Meanwhile, put a small amount of chocolate on a mint candy and attach it to one head, just above the bottom edge, for a nose. Repeat for the other heads.
6 Use the tip of a craft knife to drill 2 eye sockets through the chocolate coating just above and on either side of the nose, making the holes slightly larger than the diameter of a mint candy. Press a mint candy into each eye socket. When set, remove the head-topped toothpicks from the cupcakes. Remelt the leftover chocolate, dip the top of each cupcake into the chocolate, and let set.
7 When set, fill a pastry bag or parchment paper cone fitted with a fine plain piping tip with Piping gel “Blood” and pipe a pool of dripping blood on each cupcake, for the severed head to sit on. Remove the toothpicks from the heads and then place in the blood.
8 Use black, brown, or yellow Royal icing and the fine tip to pipe eyebrows and hair on the decapitated head. If wished, smear a knife with Piping gel “Blood” and attach to each cupcake in front of the severed head.
piping gel “blood”
Makes about 3 oz
• 3 oz clear piping gel
• 4 to 5 drops red paste food coloring
1 Put the piping gel in a small bowl, add the paste food coloring in drops or on a toothpick or the tip of a knife, and beat in until you achieve a deep blood red color. Store according to the directions on the package.
11
knives
Makes 12
• 2 oz Half and Half, colored gray with 1 drop black paste food coloring (see page 11)
• _ oz Half and Half, colored brown with 3 drops brown paste food coloring
• 1 oz plain white Royal Icing (see page 10)
1 Roll out the gray Half and Half very thinly on an acetate strip greased with white vegetable fat. Cut 6 rectangles, each measuring _ x 1 inch. Cut diagonally across each rectangle to create 2 triangular knife blades.
2 Roll out the brown Half and Half very thinly on an acetate strip greased with white vegetable fat. Cut into a rectangle measuring _ x 1 inch. Cut in half lengthwise, then make 5 evenly spaced vertical cuts to make knife handles.
3 Using the white Royal Icing in a pastry bag or parchment paper cone fitted with a fine plain piping tip, attach a knife handle to the corner of each knife blade. Pipe 2 dots on each handle to represent rivets. Let dry overnight. Store in a cool, dry place, but not in the refrigerator.
half & half
Makes about 8 oz
• 4 oz store-bought white fondant
• 4 oz ready-to-use gum paste
• white vegetable fat (optional)
1 Knead the fondant and then the gum paste separately on a counter until smooth, then combine and knead until well mixed. If the mixture becomes sticky, add a little white vegetable fat.
2 Cover with an upturned bowl or cup to prevent a crust from forming. To store, roll the mixture into a ball, double wrap in plastic wrap, and keep in a sealed container at room temperature for up to two weeks.
royal icing
Makes about 8 oz
• 1 large egg white, plus extra if necessary
• pinch of cream of tartar
• 1_ to 2 cups confectioners’ sugar, sifted
• paste food coloring (optional)
1 Put the egg white and cream of tartar in the bowl of a large freestanding electric whisk and whisk together until frothy.
2 With the machine still running, gradually add the confectioners’ sugar until the mixture begins to stiffen and turn opaque white. Scrape down the side of the bowl and whisk briefly on high. The mixture should be stiff but still pliable.
3 If necessary, thin the mixture with a little extra egg white or a drop of food coloring. Cover with a damp dishtowel to prevent a crust from forming. To store, put it in a container, place plastic wrap directly over the surface to prevent a skin from forming, and seal the container. Keep in the refrigerator for up to one week.
4 To color the icing, add the appropriate paste food coloring in drops or on a toothpick or the tip of a knife and beat in until you achieve the required color.
Zilly also runs Buffalo, New York bakery Zillycakes.
Decapitated zombie gingerbread cupcakes
• 6 tbsp milk
• _ tsp baking soda
• _ cup plus 1 tbsp (4_ oz) unsalted butter, softened
• _ cup firmly packed dark brown sugar
• _ cup blackstrap molasses
• 3 large eggs, beaten
• 1 cup plus 3 tbsp white all-purpose, cake, or pastry flour
• 3 tsp ground ginger
• _ tsp ground cinnamon
Decorations
• 12 marshmallows
• 8 oz white couverture or cooking chocolate
• 36 white hard mint candies
• 6 oz Piping gel “Blood” (see page 10)
• 8 oz Royal icing, colored black with 18 drops black paste food coloring; or brown with 36 drops brown paste coloring; or yellow with
4 drops yellow paste food coloring (see page 10)
• 12 knives (see page 15; optional)
Imagine you are cornered by a zombie in your kitchen. If you have any hopes of surviving, your best bet is to grab the nearest butcher’s knife and take a good swing. This heavenly gingerbread cupcake illustrates what a proud survivor might do after they’ve fought off the zombie’s attack: display the severed head and brag. The head is made from a marshmallow dipped in melted white couverture—good quality coating chocolate with a high percentage of cocoa butter.
1 Preheat the oven to 325°F. line a 12-hole muffin pan with 12 large paper baking cases. Put the milk in a bowl and stir in the baking soda until dissolved.
2 Put the butter and sugar in a large bowl and, using an electric whisk, beat together until pale and fluffy. Beat in the molasses and then gradually beat in the eggs. Sift the flour and spices into the mixture and beat together, then gradually beat in the milk mixture. Spoon the batter into the paper cases. Bake for about 25 minutes, turning once halfway through baking, until firm to the touch. Transfer to a wire rack and let cool.
3 For the heads, snip the corners off the top edge of each marshmallow using scissors and then cut into a domed shape. Insert a toothpick into the bottom of each marshmallow.
4 Melt the chocolate, stirring every 15 seconds, in a microwave oven on low or in a heatproof bowl set over a saucepan of gently simmering water. Dip the marshmallows into the melted chocolate up to the flat edge, allowing any extra chocolate to drip back into the bowl.
5 stick a head-topped toothpick into each cooled cupcake so that it stands upright and let set. Meanwhile, put a small amount of chocolate on a mint candy and attach it to one head, just above the bottom edge, for a nose. Repeat for the other heads.
6 Use the tip of a craft knife to drill 2 eye sockets through the chocolate coating just above and on either side of the nose, making the holes slightly larger than the diameter of a mint candy. Press a mint candy into each eye socket. When set, remove the head-topped toothpicks from the cupcakes. Remelt the leftover chocolate, dip the top of each cupcake into the chocolate, and let set.
7 When set, fill a pastry bag or parchment paper cone fitted with a fine plain piping tip with Piping gel “Blood” and pipe a pool of dripping blood on each cupcake, for the severed head to sit on. Remove the toothpicks from the heads and then place in the blood.
8 Use black, brown, or yellow Royal icing and the fine tip to pipe eyebrows and hair on the decapitated head. If wished, smear a knife with Piping gel “Blood” and attach to each cupcake in front of the severed head.
piping gel “blood”
Makes about 3 oz
• 3 oz clear piping gel
• 4 to 5 drops red paste food coloring
1 Put the piping gel in a small bowl, add the paste food coloring in drops or on a toothpick or the tip of a knife, and beat in until you achieve a deep blood red color. Store according to the directions on the package.
11
knives
Makes 12
• 2 oz Half and Half, colored gray with 1 drop black paste food coloring (see page 11)
• _ oz Half and Half, colored brown with 3 drops brown paste food coloring
• 1 oz plain white Royal Icing (see page 10)
1 Roll out the gray Half and Half very thinly on an acetate strip greased with white vegetable fat. Cut 6 rectangles, each measuring _ x 1 inch. Cut diagonally across each rectangle to create 2 triangular knife blades.
2 Roll out the brown Half and Half very thinly on an acetate strip greased with white vegetable fat. Cut into a rectangle measuring _ x 1 inch. Cut in half lengthwise, then make 5 evenly spaced vertical cuts to make knife handles.
3 Using the white Royal Icing in a pastry bag or parchment paper cone fitted with a fine plain piping tip, attach a knife handle to the corner of each knife blade. Pipe 2 dots on each handle to represent rivets. Let dry overnight. Store in a cool, dry place, but not in the refrigerator.
half & half
Makes about 8 oz
• 4 oz store-bought white fondant
• 4 oz ready-to-use gum paste
• white vegetable fat (optional)
1 Knead the fondant and then the gum paste separately on a counter until smooth, then combine and knead until well mixed. If the mixture becomes sticky, add a little white vegetable fat.
2 Cover with an upturned bowl or cup to prevent a crust from forming. To store, roll the mixture into a ball, double wrap in plastic wrap, and keep in a sealed container at room temperature for up to two weeks.
royal icing
Makes about 8 oz
• 1 large egg white, plus extra if necessary
• pinch of cream of tartar
• 1_ to 2 cups confectioners’ sugar, sifted
• paste food coloring (optional)
1 Put the egg white and cream of tartar in the bowl of a large freestanding electric whisk and whisk together until frothy.
2 With the machine still running, gradually add the confectioners’ sugar until the mixture begins to stiffen and turn opaque white. Scrape down the side of the bowl and whisk briefly on high. The mixture should be stiff but still pliable.
3 If necessary, thin the mixture with a little extra egg white or a drop of food coloring. Cover with a damp dishtowel to prevent a crust from forming. To store, put it in a container, place plastic wrap directly over the surface to prevent a skin from forming, and seal the container. Keep in the refrigerator for up to one week.
4 To color the icing, add the appropriate paste food coloring in drops or on a toothpick or the tip of a knife and beat in until you achieve the required color.
Comments